Planning to create a WooCommerce wholesale website that shines strong among the crowd? If yes, then stay right here.
With the ever-growing trend of online shopping, having a robust and user-friendly website is essential. And what better way to build your wholesale website than with WooCommerce – the leading eCommerce platform?
Now, get ready to boost your sales, streamline your operations, and provide a seamless shopping experience for your customers.
In this article, we’ll guide you through creating a wholesale website using WooCommerce.
So, sit back, and let’s dive into the exciting world of wholesale eCommerce with WooCommerce!
A) Introducing Wholesale Website – A Brief Overview
Before we move ahead, let’s explore what exactly a wholesale website is from a close angle.
As a business owner, you certainly recognize the value of having a website. But if you are part of the wholesale industry, then a standard eCommerce website might not be enough.
And that’s exactly where wholesale websites come into play! Wholesale websites are eCommerce stores designed for businesses that offer huge discounts on huge quantities on their product.
Wholesale websites cater to a different set of requirements. Such as offering bulk discounts, providing special pricing for specific customers, and managing inventory levels across multiple locations.
A wholesale website is significant for businesses selling products in bulk. It offers a more efficient way to connect with customers and streamline operations.
By using a wholesale website, businesses can:
- Automate their ordering process, reducing the time spent on manual entry and admin tasks.
- Expand their customer base to any location with internet access, creating new growth opportunities.
- Additionally, it provides a better customer experience where buyers can easily place orders, view invoices, and track their shipments.
In a nutshell, wholesale websites are crucial to modern-day trade. As it offers several benefits that enhance the buying and selling processes of firms of all sizes.
B) 3 Best WooCommerce Wholesale Plugins
Do you know that several WooCommerce wholesale plugins help you add a wholesale feature to your online stores? Some of the top choices are:
1. WholesaleX
WholesaleX is a feature-rich WooCommerce wholesale plugin that streamlines your online store’s wholesale activities. Using it, you can create an efficient wholesale system on WooCommerce-powered websites.
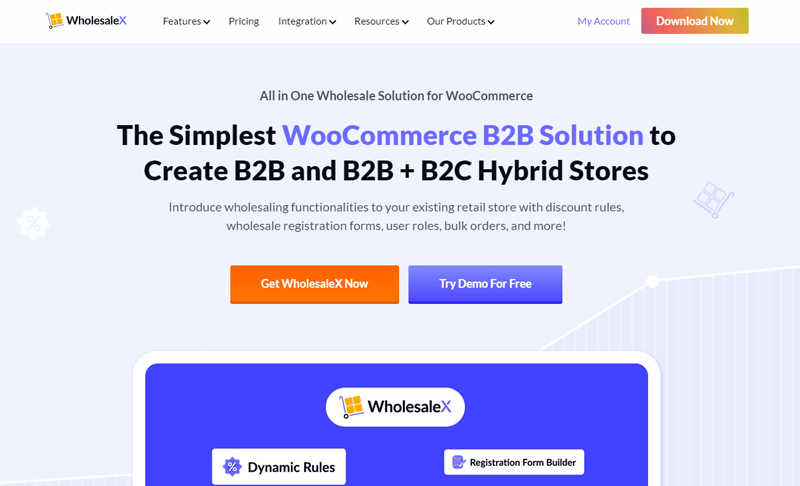
The plugin offers dynamic features like customizable pricing tiers, role-based access control, and bulk order forms. It also facilitates a specialized registration process for wholesale customers, ensuring personalized experiences.
Additionally, it gives you the ability to manage both wholesale and retail operations on a single platform. Also, it’s a useful tool for companies wishing to tap into the wholesale market while utilizing WooCommerce’s capabilities.
Pricing:
WholesaleX is a freemium plugin. You can quickly download the free version right from your WordPress dashboard.
Meanwhile, you can opt for the premium version, which starts at $103/year.
2. Barn2 WooCommerce Wholesale Pro
Last but not least, we’ve got the Barn2 WooCommerce Wholesale Pro plugin. You can utilize it to integrate wholesale capabilities into your public store.
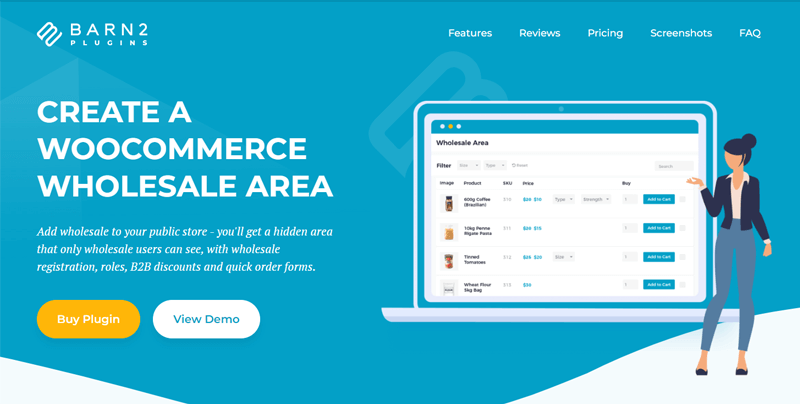
What’s more, this plugin provides role-based access control. So, you can assign distinct user roles to wholesale customers. And grant them exclusive privileges while ensuring a user-friendly shopping experience for retail customers.
Not to add, it includes features such as advanced wholesale pricing and discounts. Additionally, you can effortlessly incorporate wholesale users, one-page wholesale order forms, and do much more.
Pricing:
Barn2 WooCommerce Wholesale Pro is a premium plugin that costs you $99 per year for a single site license.
3. WooCommerce B2B
WooCommerce B2B is another capable wholesale plugin that facilitates the creation of tiered pricing. This enables businesses to offer various price points depending on the size of the purchase.
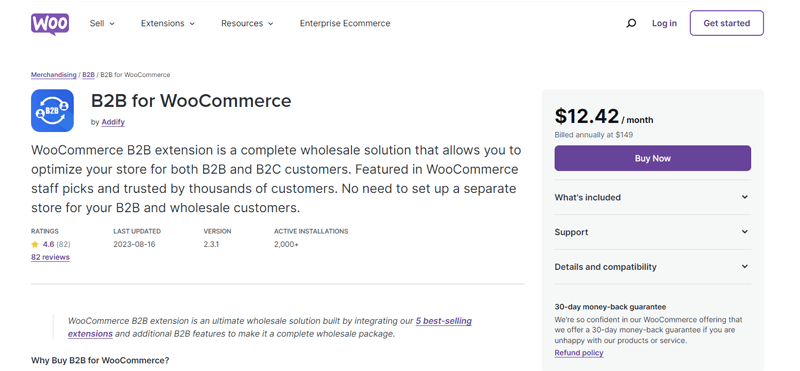
The best part of this plugin is that it includes a ‘Request a Quote’ feature. This enables customers to initiate negotiations and communicate with the business by submitting inquiries for bulk orders.
Pricing:
WooCommerce B2B is a premium plugin. This plugin typically costs $12.42 per month and $149 when paid annually. It includes support, and updates, for one year.
Our Recommendation: WholesaleX
If you’d like us to recommend one, then we’d go for the WholesaleX plugin to create a WooCommerce wholesale website.
This powerful and feature-rich plugin has a lot to offer. Order management, bulk order form, tax exemption, tiered pricing, dynamic pricing, and much more!
Therefore, WholesaleX is a fantastic choice for companies of all sizes who want to offer wholesale goods online.
Having said that, let’s proceed to learn how you can create a wholesale website with WooCommerce using the WholesaleX plugin.
C) How to Create a Wholesale Website with WooCommerce?
We’ll now take you step-by-step through the creation of a wholesale website with WooCommerce using the WholesaleX plugin.
So let’s start our journey right away!
Step 1: Requirements for Creating a WooCommerce Website
Before we get started, there are a few requirements you’ll need to meet to create a wholesale website using WooCommerce and the WholesaleX plugin. Here’s what you’ll need:
i) A Domain Name and Hosting:
To create a WooCommerce website, start by getting a relevant domain name. Then register it from domain name registrars like GoDaddy, Namecheap, etc.
Then, choose reliable hosting from providers like Cloudways, Bluehost, Kinsta, etc. Following that, you need to connect your domain to your hosting server following your provider’s guidance.
ii) Install WordPress:
You’ll need to install WordPress on your website. You can do this easily by following the installation wizard in your web hosting account via the ‘One-Click Install’ option.
iii) Install WooCommerce
Next, you need to install the WooCommerce plugin. For that navigate to the ‘Plugins’ > ‘Add New’.
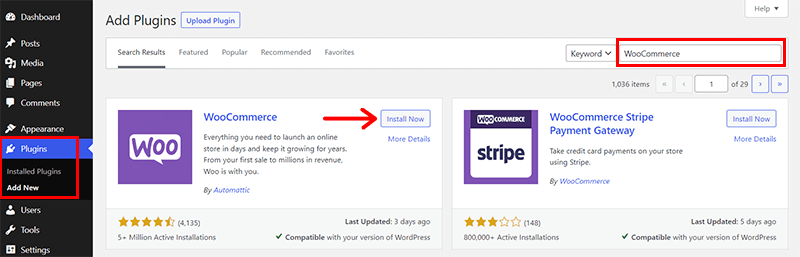
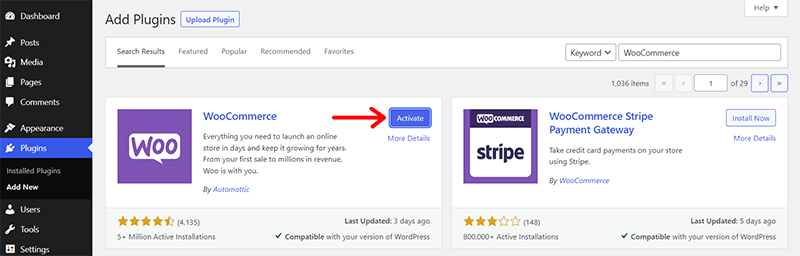
In the search bar at the top right corner, type ‘WooCommerce’. Once you locate the plugin, click ‘Install Now’. After installation, activate it by clicking the ‘Activate’ button.
Subsequently, you’re prompted to complete the setup wizard. This involves providing details like your location, business type, and product category. Ensure you accurately furnish the requested information.
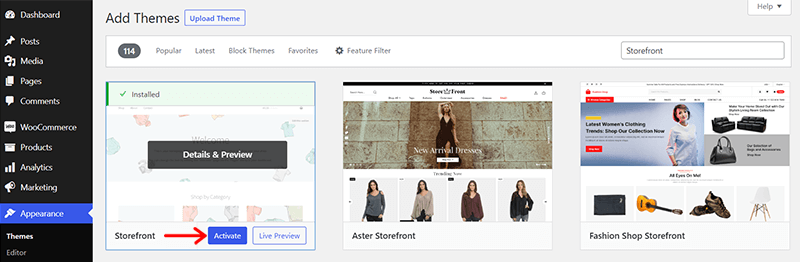
iv) Choose an eCommerce Theme
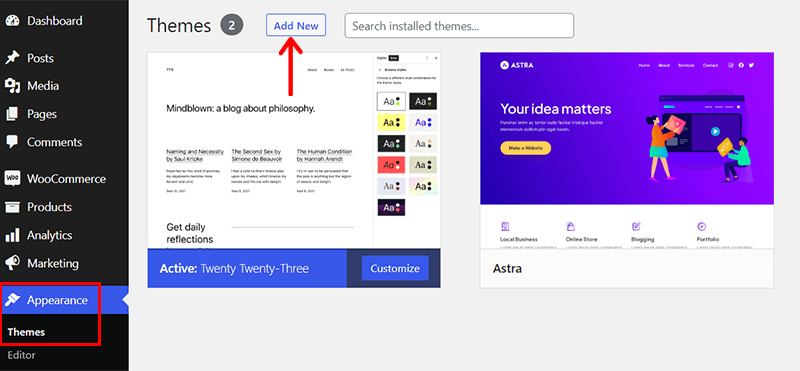
Afterward, you can choose any eCommerce WordPress theme suitable for your WooCommerce site. If you want us to recommend one, then we’d go for the ‘Storefront’ theme.
You can easily install it via ‘Appearance’ > ‘Themes’ > ‘Add New’.
Then, search for ‘Storefront’ in the search bar and once you locate click on the ‘Install’ button.
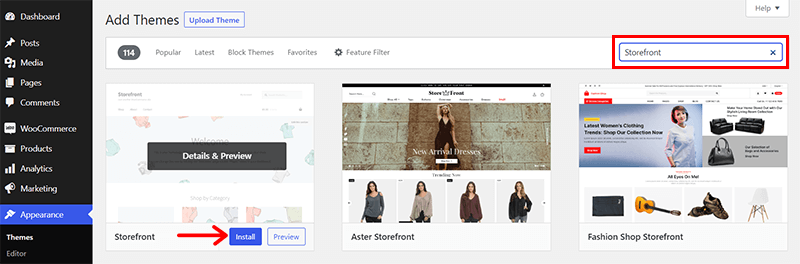
Shortly, you’ll also see the ‘Activate’ button. Click on it.
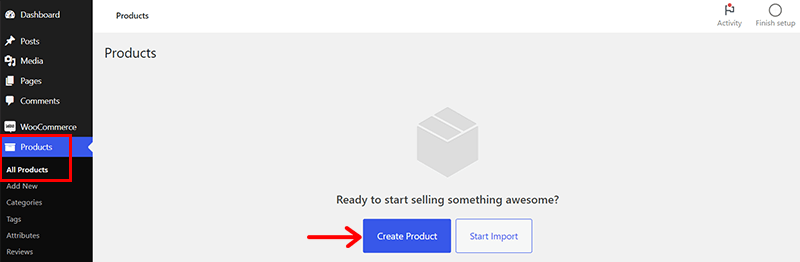
v) Add Your Products
Now, you need to add products to your WooCommerce store. For that, simply navigate to ‘WooCommerce’ > ‘All Products’ within your WordPress dashboard.
Subsequently, select the ‘Create Product’ button to add the product to your store.
Following that, you’re directed to the familiar WordPress editor, which now includes some additional features.
Next, give a suitable ‘Product Title’ and proceed to provide a ‘Product Description’ as well.
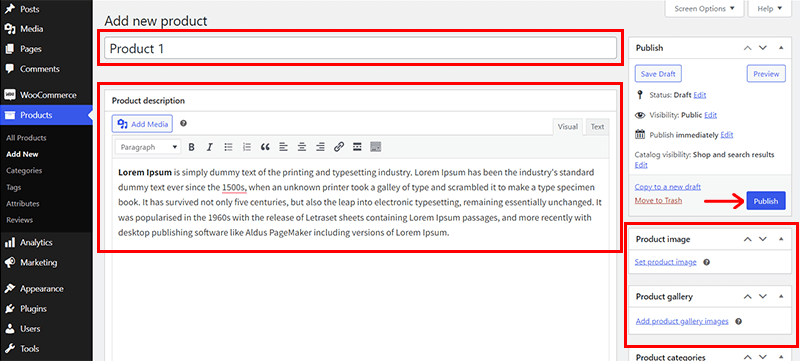
Similarly, you can specify the pricing details for both the regular and sale prices of the product.
Finally, conclude the process by clicking the ‘Publish’ button to make your product accessible to your customers.
Step 2: Setting Up WholesaleX Plugin
Next, as mentioned earlier, we’ll be using the WholesaleX plugin to transform your regular eCommerce website into a wholesale website.
Since WholesaleX is a freemium plugin, firstly, you must decide whether to go with the free or paid version.
Accordingly, you can follow the below guidelines.
i) Installing the Free Wholesale X Plugin
The installation and activation process of the free version WholesaleX plugin is the same as any other WordPress plugin. The quickest way is to install it right from your dashboard.
First thing first, log into your WordPress dashboard and go to the ‘Plugins > Add New’ menu.
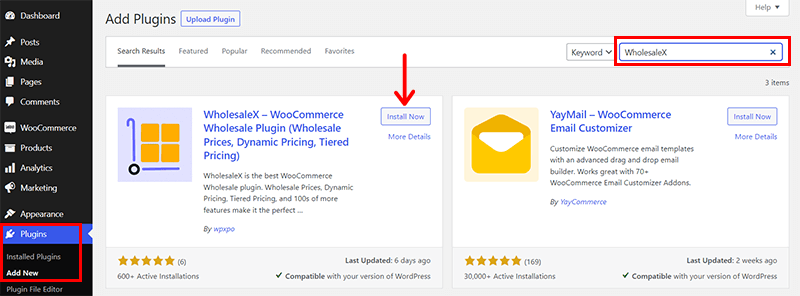
Now, type in the keyword ‘WholesaleX’ on the search bar. Once you locate it, click on its ‘Install Now’ button.
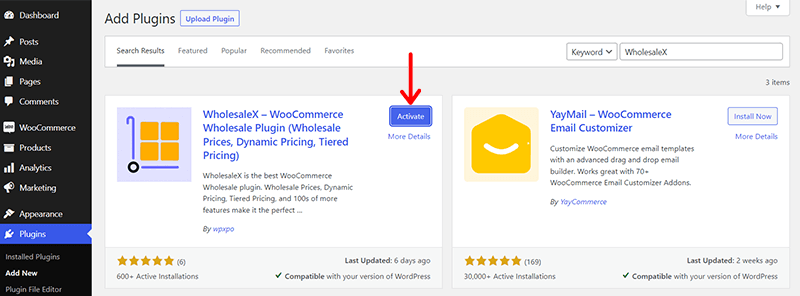
Shortly, you’ll also see the ‘Activate’ button. Click on it.
Done? If yes, congratulations! You’ve successfully installed and activated WholesaleX on your WooCommerce website.
Following that, you can see a new menu is added on the dashboard, i.e., ‘WholesaleX’. Here, you can get the notice about the plugin updates.
ii) Purchasing and Installing the Premium Wholesale X
Now, if you want to get a premium plan, then first you must purchase it from its website. Explore the guidelines below!
Initially, visit the official WholesaleX site and click the ‘Pricing’ tab on the navigation menu.
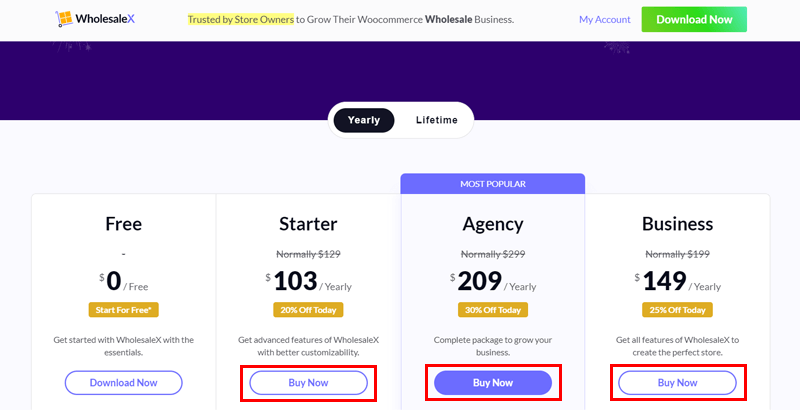
On clicking it, you’ll find the 3 several pricing options. Next, click the ‘Buy Now’ option to add the selected plan to your shopping basket.
Then, provide your billing and personal information, including your name, email address, and credit card details.
With that, you’ll get a confirmation email and a link to download the WholesaleX plugin following a successful transaction.
Now, download the ZIP plugin file, and copy its activation key for later.
Once done, come back to your WordPress dashboard and go to the ‘Plugins > Add New’ menu. Then, hit the ‘Upload Plugin’ option.
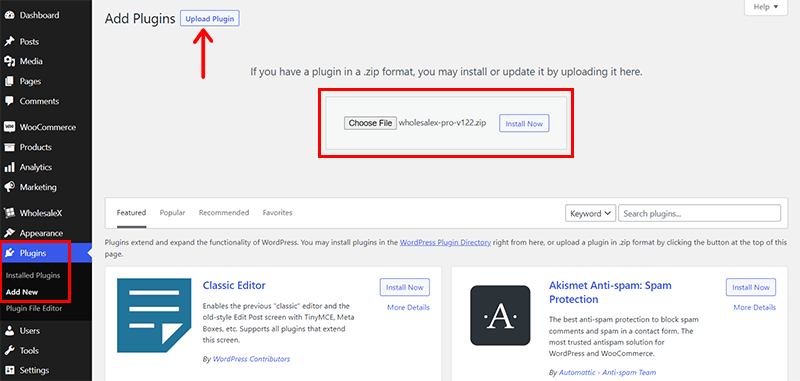
Following that, click the ‘Choose File’ button and upload the previously downloaded ZIP file. And, click the ‘Install Now’ button.
Next, you must press the ‘Activate Plugin’ button.
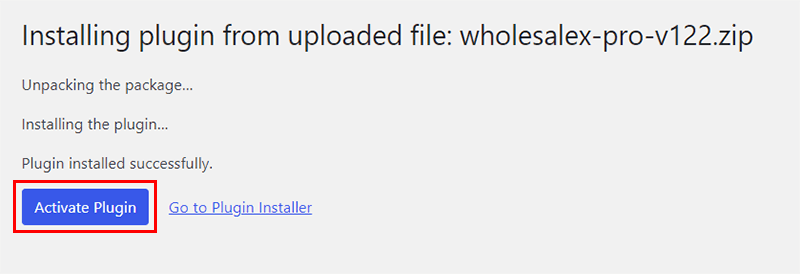
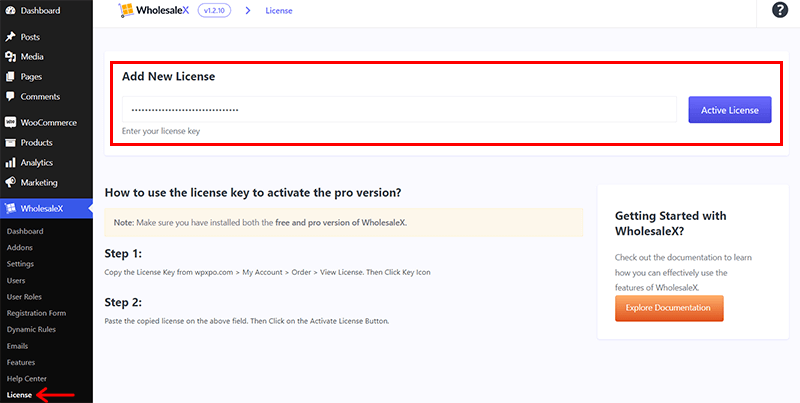
Then, go to the ‘License’ option, and paste the previously copied license key. Also, choose if you want to receive notice of new features and updates. Lastly, hit the ‘Activate License’ button.
With that, the premium WholesaleX plugin is all set to use on your website.
Step 3: Configuring the WholesaleX Plugin to Create a Wholesale Website
Now that you’ve set up WooCommerce and prepared your store, installed and activated the WholesaleX plugin. It’s time to configure the WholesaleX plugin to create a seamless wholesale experience on your website.
Follow the essential guidelines below to effectively configure WholesaleX:
i) Establishing Wholesale User Roles
Begin by defining wholesale user roles within the WholesaleX plugin. So, you can distinguish between your regular retail customers and wholesale buyers. And granting special privileges and pricing to the latter.
For that, access the ‘User Roles’ section of the ‘WholesaleX’ menu on the dashboard.
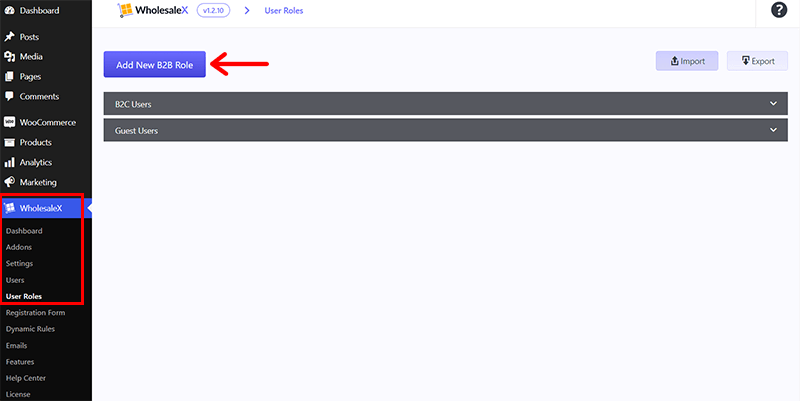
Next, create a new user role by clicking the ‘Add New B2B Role’ button.
Then, the system will prompt you to configure various options and conditions for creating distinct user roles. Such as:
- Display Prices: You can select whether to display prices including or excluding tax, and choose the default option.
- Payment Methods: Choose the payment method that customers under this user role will see exclusively.
- Shipping Methods: Offer either a flat rate or free shipping from the shipping method selection.
- Coupons: Enable or disable coupons for this user role.
- Auto Role Migration: Activate or deactivate the automatic migration of customers who spend the specified amount to the current role.
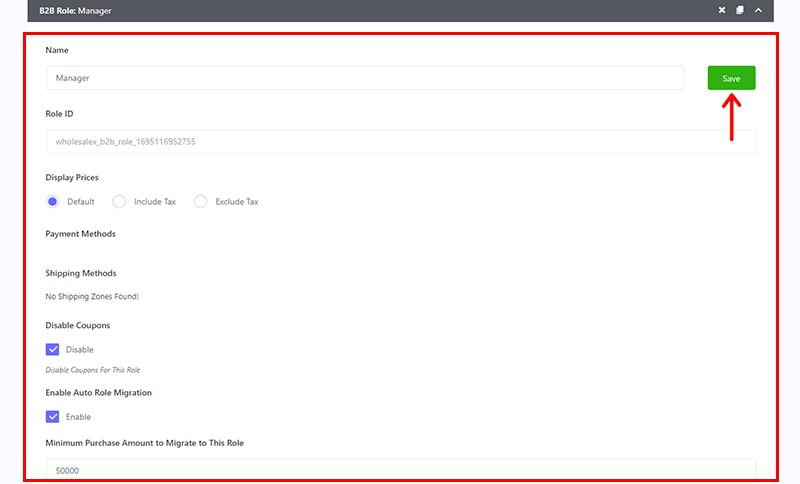
Once all the configurations are in place, save the changes and add a new user role to your website. For that, simply click on the ‘Save’ button.
ii) Setting Up Dynamic Rules
Dynamic rules are the heart of your wholesale pricing strategy. WholesaleX allows you to create rules based on factors. Like quantity, product categories, or customer groups. This flexibility ensures that your pricing structure aligns with your business model.
To accomplish this, you can go to the ‘WholesaleX > Dynamic Rules’. Then, click on the ‘Create Dynamic Rule’ option.

Now, let’s set up major rules like ‘Product Discount’ and ‘Payment Order Quantity’.
a) Product Discount
To create a Product Discount, start by clicking ‘Create Dynamic Rule’ and expand the untitled Rule. Then, you can do the following actions:
- Name the Rule for easy identification and select ‘Product Discount’ from the Rule Type dropdown menu.
- Choose the user type (All Users, All Roles, Specific Users, or Specific Roles) and the product filter for precise targeting.
- Specify the discount type (Percentage, Amount, or Fixed Price) and input the desired discount amount.
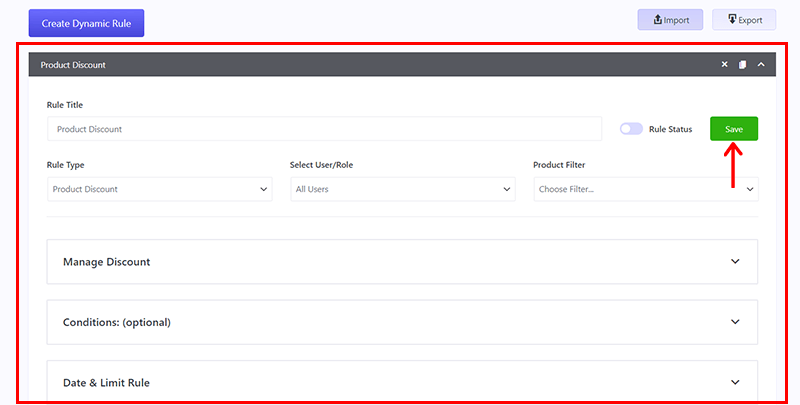
Lastly, ‘Save’ your changes to activate the discount in WholesaleX.
b) Payment Order Quantity:
Similarly, you can use the Payment Order Quantity feature of WholesaleX. That means setting a minimum order quantity requirement for payment gateways.
For that, you can do the following:
- Create a new dynamic rule and name it (e.g., Payment Order Quantity).
- Choose the user type (All Users, All Roles, Specific Users, or Specific Roles) and the product filter for customization.
- Select the payment gateways to which the quantity restriction applies.
- Set the Start and End Dates, as well as the minimum Payment Order Quantity.
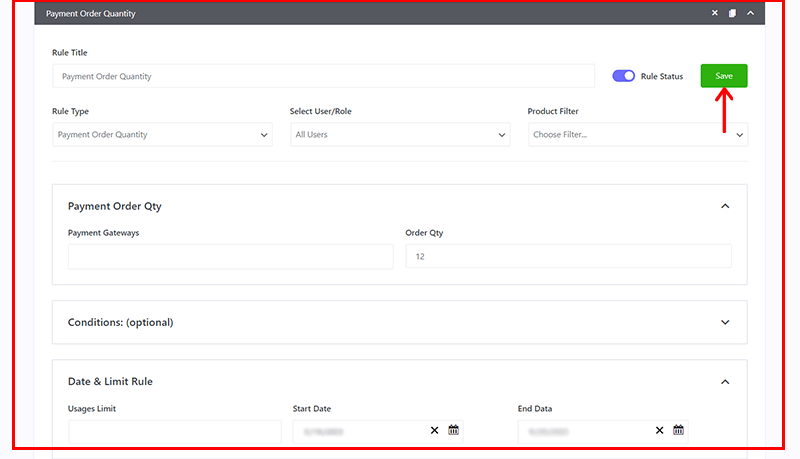
Finally, ‘Save’ and activate the rule to enforce quantity restrictions on selected payment gateways.
iii) Making Custom Registration Forms
Similarly, tailoring the registration process is crucial for wholesale customers. With WholesaleX, you can create custom registration forms, gathering specific information from your wholesale buyers during signup.
This customization streamlines your approval process and helps you collect essential data for better customer management.
To do so, go to the ‘WholesaleX > Registration Form’ menu. You’ll discover a pre-existing basic form that includes essential fields such as Email and Password.
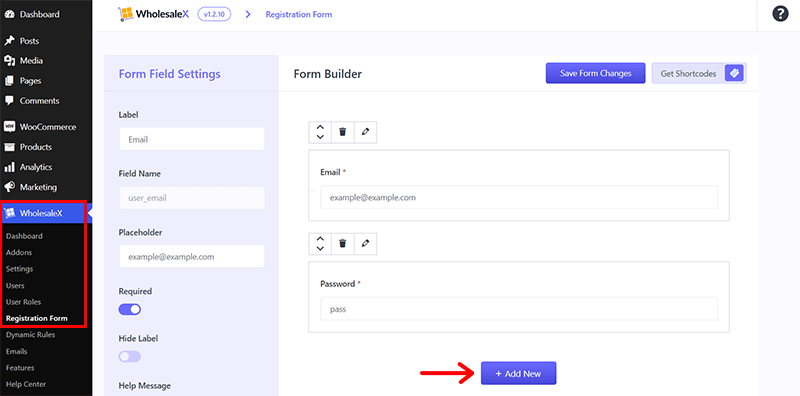
Click on the ‘Add New’ option and configure the following settings for the registration form:
- For the ‘Default User Field’, select options like first name, last name, email, username, password, website, user bio, and more.
- Customize the form further by including ‘Extra Fields’ such as text areas, checkboxes, dates, files, etc.

After making these adjustments, press the ‘Save Form Changes’ button.
iv) Altering Store Mode
Do you know you can adjust your store mode using WholesaleX to maintain separate retail and wholesale experiences?
WholesaleX empowers you to switch between a comprehensive B2B, B2C, and B2B+B2C hybrid store. Ultimately, ensuring a consistent shopping experience for all customer types.
This means you can switch the store at your convenience. To do so, access the ‘WholesaleX > Settings’ menu from your dashboard.
Subsequently, within the General Settings tab, navigate to the ‘Plugin Status’ section, where you will find various modes to choose from:
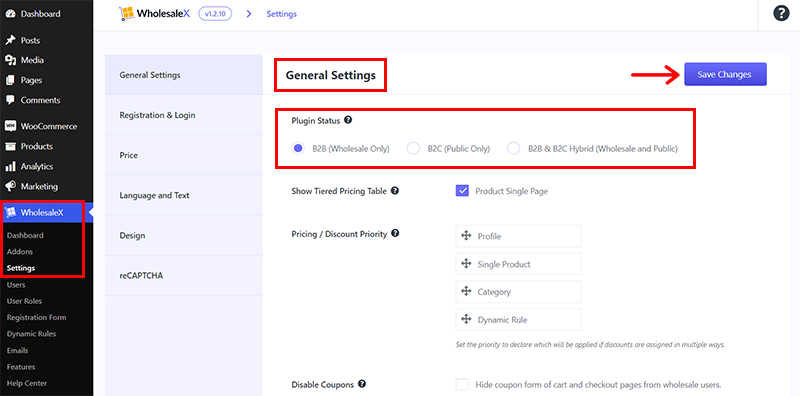
- B2B (Wholesale Only)
- B2C (Public Only)
- B2B & B2C Hybrid (Wholesale and Public)
To switch your store mode using WholesaleX, simply select your preferred mode and click on the ‘Save Changes’ button.
This straightforward process empowers you to effortlessly transition between store modes using WholesaleX.
v) Choosing Pricing and Discounts
Similarly, you can take advantage of WholesaleX’s pricing and discount features.
Meaning, you can set tiered pricing structures for different quantities or offer exclusive discounts to wholesale customers. This flexibility allows you to reward loyalty and incentivize larger orders.
For that, reopen the ‘WholesaleX > Settings’ menu. Within the settings page, choose the ‘General Settings’ tab.
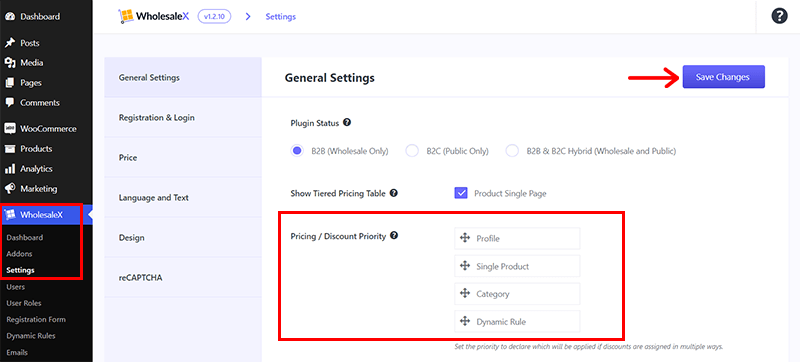
WholesaleX provides Pricing/Discount Priority settings that rely on Profiles, Single Products, Categories, and Dynamic Rules.
So, you can effortlessly arrange your preferred discounts/pricing by utilizing the drag-and-drop functionality.
Lastly, press the ‘Save Changes’ button. After saving the changes, the priority you’ve designated for discount types is applied.
vi) Managing the Product’s Visibility
Last but not least, you can control which products are visible to your wholesale customers and retail shoppers.
WholesaleX lets you choose which items appear in each user’s catalog. Further, it ensures that wholesale buyers only see relevant products while maintaining a robust retail selection.
For that, once again navigate to the ‘WholesaleX > Settings’ option.
Next, within the General Settings tab, you will find 2 options:
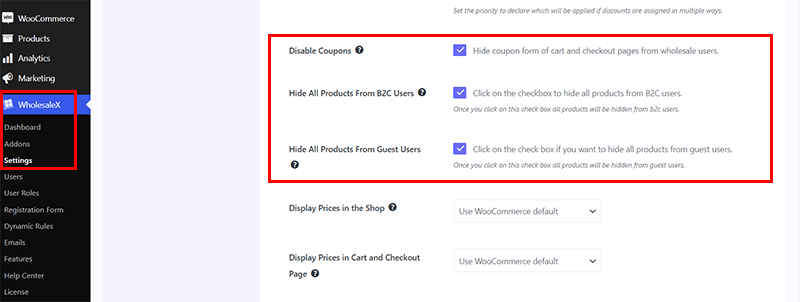
- Hide All Products from B2C Users
- Hide All Products from Guest Users
Simply check the box next to the option you wish to use for hiding your products.
Also, you can modify coupon visibility for your wholesale users. To conceal coupons, mark the checkbox next to ‘Disable Coupons’.
Once you click the ‘Save Changes’ button, the product visibility settings are changed on the website’s front end.
Step 4: Verify Everything & Launch Your Wholesale Website
Once you have set up your wholesale website using WooCommerce and the WholesaleX plugin. It’s crucial to verify everything before launching it to ensure a smooth customer experience.
Here are a few essential tasks to complete before going live:
- Confirm user registration: Ensure successful account creation, document submission, and email confirmation for new customers.
- Validate pricing and discounts: Verify the accurate application of pricing rules, bulk discounts, and special pricing for specific customer groups.
- Test cart and checkout: Check for a smooth process from adding products to payment completion.
- Review email notifications: Ensure automated emails (order confirmations, shipping updates, invoices) are set up correctly and delivered.
- Conduct website audit: Review all site elements for accurate information (product details, prices, shipping, policies).
- Secure SSL and payment gateways: Install SSL(Security Socket Layer) for data encryption and set up secure payment options.
- Check cross-browser compatibility: Ensure consistent design and function across various web browsers.
After you have verified and tested everything, you are ready to launch your wholesale website. Soft launching or inviting select customers for pre-launch testing helps uncover issues and gather feedback for improvements.
With this, you can launch your wholesale website created with the perfect combination of WooCommerce and WholesaleX.
Congratulations! Your wholesale website is now live and ready to serve your business customers.
D) FAQs About Creating a Wholesale Website with WooCommerce
Here are some frequently asked questions (FAQs) about creating a wholesale website with WooCommerce.
Q.1 What is WooCommerce, and why is it suitable for a wholesale website?
A: WooCommerce is a popular open-source eCommerce plugin for WordPress. It’s ideal for a wholesale website as it allows you to easily manage products, offer robust customization options, and so much more.
Q.2 How do I set up a wholesale pricing structure with WooCommerce?
A: You can set up wholesale pricing by using plugins like WholesaleX, WooCommerce B2B, etc. These plugins enable you to create different pricing tiers for wholesale customers and set minimum order quantities.
Q.3 Can I track inventory and manage stock for wholesale products separately?
A: Yes, WooCommerce lets you manage stock and inventory separately for wholesale and retail products. You can set stock levels and manage them independently.
Q.4 What payment gateways are suitable for wholesale websites with WooCommerce?
A: WooCommerce supports various payment gateways, including PayPal, Stripe, and Authorize.net. You can choose a payment gateway that suits your wholesale business needs and integrates well with WooCommerce.
Q.5 What are some security measures I should take for my wholesale website?
A: Ensure your website is secure by regularly updating WooCommerce and WordPress, using strong passwords, and implementing SSL encryption. You can also consider security plugins like Wordfence or Sucuri.
Remember, while WooCommerce offers a robust platform for creating a wholesale website. Yet, it may require additional plugins and customization to meet your specific needs.
Conclusion
And that’s all folks! We’ve come to the end of our article on how to create a wholesale website with WooCommerce.
We hope you found this guide helpful and wish you success in your wholesale business endeavors.
Remember, regular monitoring, updating, and improving your website will ensure its long-term success and continued customer satisfaction.
If you’ve got any confusion, then do let us know in the comment section below. We’re happy to hear you out.
Do check out our other articles. Such as how to create a WooCommerce custom product layout and how to create a gallery in WordPress. Remember to follow us on our social media handles Facebook and Twitter.


